Due to the massive amount of requests I got for this, we simply had to make a tutorial showing you how to make your very own huge roving rug.
MATERIALS: Roving! I used 7.5 lbs of gray merino wool roving for the size you see here. 3 feet across. Not gonna lie… it was a spendy rug. What is roving? There are different types but it’s basically wool that’s been cleaned and prepped and now all the fibers are lining up pretty and ready for use. Normally roving is used for hand-spinners to spin into their own yarn. But today, we’re using it AS our yarn.
Find roving here or look on Etsy.com or google: wool roving.
I used soft merino wool which is more spendy than other types of roving, so feel free to use Corriedale wool or BFL (Blue-Faced Leicester) wool, or even cotton, bamboo or any other type of wool.
Another option is to cut 2-3″ strips of fabric and use that. That’s a much cheaper route. The roving can cost several hundred dollars for this size of rug. I used 7.5 lbs total.
TOOLS: None really since we’re using our fingers as our crochet hook. Just a scrap of yarn or a little stitch holder like I use in the video. This will mark the end of each round.
If you’re a crocheter, this should make perfect sense. If you’re not a crocheter and this video confuses you (hopefully not! I tried to go slowly so you could really see what I was doing and follow along even if you don’t crochet), you can checkout my crochet videos on my YouTube channel. I have knitting, spinning and other tutorials as well, so feel free to subscribe if you don’t want to miss out on any future episodes.
Let’s begin!
.
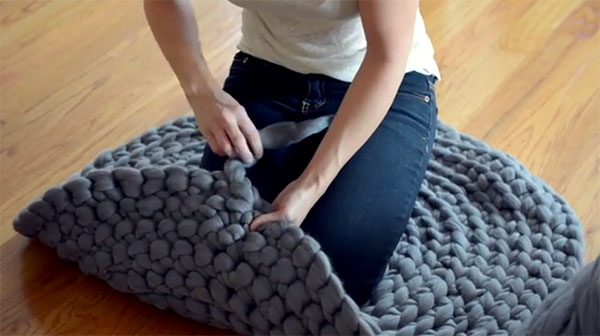
We’re working single crochet rounds, but due to the bulkiness of the roving, we are not completing each round. We’re continuing around in a spiral. It’s important to mark the end of each round as you finish it, so you can keep track of where your previous round ended.
Abbreviations –
ch=chain
sc=single crochet
sl st=slip stitch
START –
Create a slip knot. Ch 2.
Rnd 1: Work 6 sc in your original slip knot loop. (Pull the tail gently to tighten up your hole).
Rnd 2: Work 2 sc in the BACK LOOP of each sc around. – 12 sc (Remember to mark the final stitch of your round and move it to the new round after finishing each round!)
Rnd 3: Work 2 sc in the BACK LOOP of the first stitch and then 1 sc in the BACK LOOP of the next stitch. Repeat around. – 18 sc
Rnd 4: Work 2 sc in the BACK LOOP of the first stitch and then 1 sc in the BACK LOOP of the next 2 stitches. Repeat around. – 24 sc
Rnd 5: Work 2 sc in the BACK LOOP of the first stitch and then 1 sc in the BACK LOOP of the next 3 stitches. Repeat around. – 30 sc
Rnd 6: Work 2 sc in the BACK LOOP of the first stitch and then 1 sc in the BACK LOOP of the next 4 stitches. Repeat around. – 36 sc
Continue in this pattern until finished. Mine is 3 feet across! Make yours as big or small as you like.
Keep these 2 things in mind:
1. You’re increasing 6 stitches per round. Count and make sure at the end of each round!
2. The pattern should be obvious, but you’ll see you’re working 1 additional SINGLE sc per repeat, each round. So your increases (the part where you work 2 sc into 1 sc, thus increasing) are becoming farther and farther apart.
FINISH –
Work 2 sl st and weave in your ends as I show in the video. Have fun squishing around on your huge rug!
To clean it, just pick it up and shake it out.
Any suggestions for future videos? Post below! Thank you!
Hope you loved the video!
Chandi
Scooting on your knees. So funny!!!! Great tute.
You gave very clear instructions for this very versatile rug. I remember this process when I was a little girl and learned to crochet first with my fingers. I won’t say how long ago but I will probably made one of these for a new grandchild’s room.
Cool!!!
As I was watching (and drooling) I couldn’t get over how much this looks like a beautiful challah bread. Thanks for sharing. Your yarns are going to be the death of me…and my bank account!
Beautiful and squishy, but man that’s a lot of roving! Thanks for reminding how fun it is to finger crochet–haven’t done that since I was a kid!
This design iss spectacular! You definitely know how to keep a
reader amused. Between your wit and your videos, Iwas almost moved to start my own blog (well,
almost…HaHa!) Excellent job. I really loved whatt
you had to say, and more than that, how youu presented it.
Too cool!
Mrs. Chandi,
I was wondering where you got the 7.5 pounds of wool roving, I would like to buy some. Do you sell it?
Sincerely,
Patty pie
I too would like to know where to get 7.5 pounds of wool roving, and how much that would cost???
Sherri
Search on google for “roving bump.” It’s not cheap, and will probably cost several hundred dollars.
Really beautiful! Would it also be possible with jute? Or too difficult?
I’m not sure. I’ve never worked with jute. I guess it depends on how comfortable you are with that fiber.
Looks amazing! I’m planning on making one when our house is finished and we can move in next year. I don’t think I’ve seen roving come continuous in that kind of length before. What do you do if you need to join ends?
Kindest Regards,
Nora
Just lay the ends together and keep on going!
That is definitely on the must make list now. Think I might use old towels though because my pups and cats would have a field day with all that lovely fluffiness, I can already see my little Chugi shredding it and making himself a nest somewhere. Maybe when the boys grow up a bit they won’t love yarn and roving so much, LOL a girl can dream!!!!
Hey Chandi, I love your videos, I love this one with the giant rug but really couldn’t find a yarn as thick as the one you’re using. Do you guys sell it? How many ply? Please let me know were I can find the yarn. You would make me really happy. Thanks! 🙂
We did, but it’s sold out now. We have some cream roving here if you like: http://www.expressionfiberarts.com/categories/silk-hand-painted-roving.html Or you can look on etsy or just google “wool roving.” 🙂 Have fun!
LOVED your video! you gave very clear and concise instructions and it was comforting to hear you explain the pattern of increases, rather than just making us follow the written pattern.
Hmm, seven and a half pounds of roving, huh? Maybe i had better try it with fabric strips instead, since YARN is not the only craft supply in my stash!
Thanks for being sweet and UPBEAT in all you do. It was fun watching you dance around on your rug.
Wow! Gorgeous! And watching you do this made me totally understand back loops and crocheting!!!
THanks!
Diane
Oh my goodness! Could you be any cuter! I love your voice! So neat getting to ‘hear” you. I know how to crochet in the round, but could watch this over and over just to listen to you talk. Thank you for the roving rug idea and inspiration! Melanie @3Boys&ABallofYarn
I love this…but can’t seem to find any site that sells roving by the pound. All I have come across are 1oz, 4oz, or 8oz size offerings. Any current suggestions?i am not that worried about cost 🙂 …just locating a supplier who sells large quantity.
[…] DIY Instructions and Project Credit – ExpressionFiberArts […]
What a great tutorial!!!! i totally understand it. which for me is a feat to do most of the time! It even helped me with the regular size crochet.
Hi! I would like to make a round rug for outside use. What would you recommend I use for ‘yarn’? Thanks and I’m so glad I found your site on pinterest!
Delena
Love your tutorial!! is it possible to make an oval rug this way?
Awesome pattern 🙂 And something completely different. Definitely going to try this.
Curious about how the roving stands up to wear over time? I’m assuming it’ll start to felt?
fantastic idea!!
I just saw this tutorial! I can’t wait to make one for my little girls room! I was wondering if you knew where I could get some of this wool. It hard to find when searching!
Thanks!
Jennifer, I’d check out etsy and also your local farmer’s markets or farms!
Love how this rug looks! The best part is that your tutorial is so easy to understand and follow. Thank you very much for sharing it with all of us!
Hi, I love this idea and want to use fabric strips. How many yards would you suggest?
Hard to say, as it depends on so many factors, but probably a LOT more than you think! 🙂
Fantastic! Your instructions were perfect. Thank you.
[…] could be better than a cozy crocheted rug? We don’t even need to go to a rug store to get one! Expression Fiber Arts shows us how to get one using just our hands and lots of wool. Get the written step-by-step […]
Hello Chandi, I love this and would try the same think.
Can you help me to find the wool?
Thank you very much and thank you for this post
Can one of these be made in a rectangular or square pattern?
[…] There is a tutorial in the video below or full instructions can be found on the Expression Fiber Arts website. […]
i love the idea of using fabric strips but how long and actually, how, do you do it… do you have a fabric strips video??
Do you have any idea how much material (fabric) you’d need to do this? I’m also thinking you just sew the ends of the fabric strips together right? It could be a really pretty rug with the fabric.
[…] There is a tutorial in the video below or full instructions can be found on the Expression Fiber Arts website. […]
[…] There is a tutorial in the video below or full instructions can be found on the Expression Fiber Arts website. […]
how do you clean this rug?
Hi Chandi,
i am from Australia and i really love you work. i want to make a 6 m square black and white rug. what dimensions do you think i would need of the merino wool. i have tried looking for wool similar to the the one in this video but i cannot find any in Australia. do you know if i can purchase online? ( do you know or have a website that sells these things…)
thanks 🙂
We no longer carry it but you can google “wholesale roving” or “roving bump.” Also ask around at your local sheep farms!
I would love to make chair pads (if that’s possible) but need help. How much wool would it take to make 6 chair pads? Thanks for your help! Robin
Hi, I would really like to make a rug like this but rectangular for my sitting room. I love it and have been searching for a pattern to give to my friend for a while to help me. What do you suggest?
Just find any simple crochet pattern you like (like for a coaster) and it will work. Just basic single crochets done in rows would be awesome.
Just tried this using Loops and Threads Huge yarn (100% polyester – not as nice as wool). 15 yds, 7.97 oz. Two skeins made a circle 15″ across. Will try with fabric strips next.
This is great! I’ve got about 25 pairs of large man’s jeans in a bag in the garage…I’m going to cut them into strips and give this a try..I’ll just keep going til I run out of fabric! It will make a great floor pad for the dog.
LOVE IT CAN’T WAIT TO GET STARTED….
very neat! I plan to try this to show my daughter how to crochet so she can see the stitches better before we move on to a crochet hook. I did notice during the video- during the 2-1-1 round, you explained it well, but then said just continue that pattern, 2-1, 2-1, 2-1. might confuse someone who’s just learning. thanks for the pattern. can’t wait to try it!
Where do you find roving?
Just google it and you will find lots of options. Also, try etsy.com
I did google bulk roving wool for sale and found the best option is on EBay selling 8 pounds for $158.95 plus $24.95 for shipping. You did say it was a bit pricey in your video, and I agree! I think I will use your idea for making a rug, but use hemp rope for a cheaper outside rug.
I am going to try this with old t shirts cut into long stips
How large does this rug work up to be?
Mine is about 3 feet across
Hi Chandi…
Absolutely love this project!! Definitely wanna give it a try.
Wanted to check.. How would you incorporate different colours – like 2 or 3 shades of Roving?
Sorry I have never done something like this. How will I go about to add the new colour?
Thanks Sintiche (south africa)
You could just layer the roving over the new color and keep working! I say give it a go and see what happens!
Your no sew rug was amazingly beautiful and genius. I save material all the time waiting for my grand opportunity to make a rug or two, but you have changed my mind about that. I will be purchasing material for the purpose of making awesome no sew rugs. Great job, Chandi and so pretty and soft.
[…] the written step-by-step instructions on her site, then watch her demonstrate the technique […]
Found this crochet rug on pinterest. First time ever crocheting and I completed my own rug with these instructions in nearly 2.5 hours of crocheting. I found grey thick yarn at my local Michaels on sale and it took 10 balls of yarn to complete. I love it so much and many of my friends have asked me to make one for them too.
Do you have a pattern for a blanket instead of a rug, using the same finger crochet?
Not yet… but working on it.
Hi, would LOVE to use this pattern/technique for a rug. I am wanting to use old sheets and at 3x the diameter of your finished rug. I was trying to figure out how much length I would need, but the yarn you used is listed in weight and not length.
Any idea how much length I would need for my project?
I’m actually not sure…sooo sorry about that.
i’ve just finished making this. It was very therapeutic! Mine doesn’t look as nice as yours though 🙁
LOVE THIS!!! Have you ever made one in a square or rectangle? If so, please share the pattern! I’m not creative enough to pattern my own 😉
Not yet, but I have to put it on the list of things to create! : )
Any idea on the length used for this and about what thickness you were working with? Im debating on using a different material- like Jute or Sisal, but im having a hard time figuring out how much to buy.
I’m not sure of the length. It was just 7 and 1/2 pounds of roving.
Dear chandi,
When i first saw this tutorial i was going crazy.I never thought crocheting was this easy.And i decided i want to give it a try. But sadly,i cant get roving material in my country(myanmar) or maybe i dont know where to get…so i decided to do it with a stretchy fabric like jersey.and it did work out well enough.Everyone liked it.But i wanna make an another one for my husband like a sleeping rug because he travels alot. Can you suggest the pattern for me? I dont know how to make a rectangular one.and can you suggest what type of material would be cool and not weighty? We have a very hot weather here. Thanks so much chandi.
You r very lovely.Seeing your videos makes me smile. 🙂
Shabnam, any crochet pattern you find would work. Just look up a simple square or rectangle and you’ll be basically doing it bigger. Tshirt fabric cut into strips works great!
Thank you so much!
Hi Chandi,
That is so cool. My whole house has hard floors. I have so much unused roving. Think I may have to try one.
Can I ask …. Where do you get “roving”?
You can google the term roving and see what links pop up. You can see if your local yarn shop has any. You can also check out sites such as ravelry.com and see some resources. Hope this helps.
Loved the video and how clearly you taught the content. Do you have a video or blog on cutting material into strips to make the rug? I’m unable to visualize how to get continuous strips of fabric to make the rug.
Thank you!
I don’t I’m afraid!
I am trying to print the instructions for the giant circular rug but can’t figure out how to do it. Is there any way you can help please
I knitted 3 yarns together in a long, long continuous rope and then followed your instructions for this rug. It turned out gorgeous and made it nice and thick, just like the roving would. Very thick.
Hi Chris – do you know what length in total of yarn you used for his rug? There’s some woollen rope on Etsy I’d like to give this a go with, but I have no idea of the length I’d need. Thanks! Maya.
Oh my, I used a lot of yarn, mostly from my stash which I had several huge storage containers. And I made mine a lot bigger than what her tutorial looks like. It is very thick though and I look forward to making more when I get a chance. Depends on how big you want it. Great for grandchildren to lay on when they are small and can’t get away. Everyone one who has seen it wants me to make them one, until they find out how much yarn I used. This is the only item I have ever made that I have kept for myself in 30 years.
All rovings are not the same What kind of doing should I be looking for
Cant seem to distinguish one from the other when I look at websites
The roving you have used seem s to be kind of tight
How can I make a crotched rug non-skid ?
Mary, maybe puff paint on the bottom?
I am an avid crocheter. This is definitely something I would try . My only question is where I can buy this much wool. I have never seen it in any of my local craft stores like Michaels or Joann fabric.
Thanks for the video.
Terry
You can try using the google search term roving. You should be able to find some suppliers there. : )
How would I make an oval rug using the same no sewing method.
Thanks
Love the video
Jane
So beautiful and easy! I can’t afford to make one, but for anyone else looking, I spotted the roving on Wish for cheaper than most places. They have gorgeous colors (including multicolor!) for $6/250g. It would cost a little over $100 to make the rug (still too expensive for me, but it could make the difference for someone else 🙂 Again, such an awesome project!
I just came across this video and blog on Pinterest!! I have been wanting to learn to crochet, and am needing a rug for my room… you mentioned using fabric instead of the wool… is there a blog or post that you would recommend to show what you mean by joining the fabrics together??? Super confused and curious!!! PLEASE HELP A NEWBIE!!!!!
I don’t have a post for that. There might be something lurking around, but I’m not sure where it is. Thanks for watching!
Id love to do this but in a rectangle – is that dooable?
Absolutely!
this is build from scratch, amazing…
I love it going to try to do this! Thank you
If anyone is still looking at this comments thread, you can get roving on the Wish app! I think I got enough for this project for about $35 or $40! It takes awhile to come, but so worth it! Someone mentioned a rectangle. You can arm knit with this stuff, too! Might be easier on your fingers.
This rove rug would make a beautiful surprise for my lovely daughter and her home. I fell in love with it and she absolutely loves heartfelt gifts. I know this would be an exceptional gift for her home.
I wish list to purchase every thing to complete the rug. When the time becomes available. Or you can direct me to the retailer has the beautiful rug Supplies available.
Thank you In advance for your time and concerns to assist me.
Love it. One question. Have you tried to make it a non-slip? Can you suggest anything to put on the underside that wouldn’t mark vinyl floors over time?
Hi there,
thank you for your comment. I don’t think we tried to make it none slip but I would suggest purchasing some non-slip rug backing and cutting it into strips and then sewing them to the bottom side of the rug to make it stay in place. This also doesn’t damage floors.
I hope this helps. Happy New Year! – Johanna 💕
[…] Crochet A Giant Circular Rug from blog.expressionfiberarts.com […]