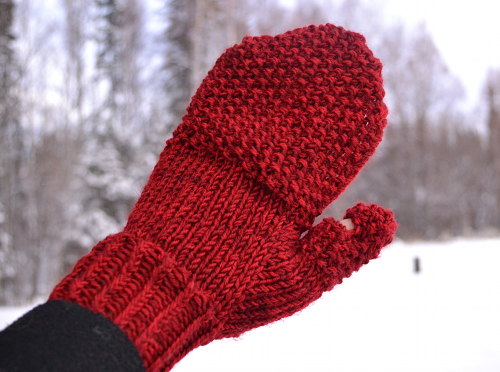
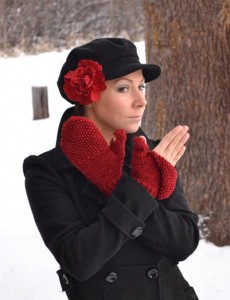
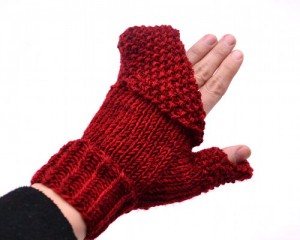
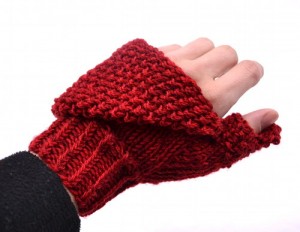
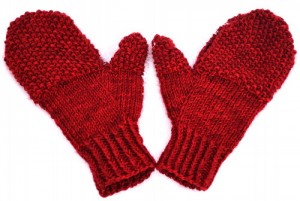
These convertible mittens are functional and warm and can be worn in two different ways: As a normal mitten for cooler winter days and as a fingerless mitt for those times when you need to use your fingers: Pulling out your credit card at the grocery store, rifling through your keys, texting on your cell phone, etc. Here I am piddling on my iPhone:
I’ve decided to offer the pattern for free! I’d say it’s an intermediate pattern, as I am assuming you understand how to work seed stitch. Any stitch that is purled (has a purl bump) you want to knit. And if the stitch is a knit stitch, you’ll want to purl it.
I have made SCADS of pairs of regular flip-top mittens and I am just tired of making them. So I just started knitting these, knowing I wanted them to be different from anything I’d made before and still be functional for my uses. And I’m really happy with them!
Plus they are in my new Crimson yarn, which I’m in love with and actually designed based off of my hair flower that I wanted them to match. Woo! LOVE!!
These are designed to flip over your fingers like so, and then flip again to be fingerless mitts:
And there’s a slit for the thumb too!
So without further ado, here is the pattern:
SIZE
These will fit most women…
Length: 9.5 inches
Width: 3.75 inches
MATERIALS
70 g of fingering weight wool held double (I used my LusterSoft Fingering wool in color: CRIMSON) If working with one skein, you will want to create a center-pull ball or wind your yarn into a center-pull yarn cake. Then you can hold one strand from the outside and one from the inside. Here is a link on how to wind a center-pull ball in case you’ve never created one:
https://blog.expressionfiberarts.com/2012/03/04/how-to-wind-a-center-pull-ball-with-your-hands/
NEEDLES
US 8 (5.00 mm)
OTHER TOOLS
Tapestry needle for weaving in ends
GAUGE
5 st/in in stockinette stitch
NOTES
Each mitten is identical, except for where the slit in the mitten is placed. So create two and then place the slit on the side of the mitten where your pointer finger is.
ABBREVIATIONS
BO=Bind Off
CO=Cast On
K=Knit
K1tbl=Knit 1 through the back loop
K2tog=Knit 2 together
LLinc=Left-leaning increase
RLinc=Right-leaning increase
P=Purl
P2tog=Purl 2 together
Rnd=Round
SSK=Slip, Slip, Knit
St=Stitch
Here we go!
————–
CO 30 st using the long tail CO method.
Divide your stitches among your needles and join to work in the round, being careful not to twist your stitches.
Work 1×1 twisted rib for 14 rounds. Twisted rib = (K1tbl, P1) around.
K 2 rnds
Now we’re going to start increasing for the thumb.
K13, RLinc, K4, Llinc, K13
K (meaning knit this rnd)
K 13, RLinc, K6, LLinc, K 13
K
K 13, RLinc, K8, LLinc, K 13
K
K 13, RLinc, K10, LLinc, K 13
K
K 13, RLinc, K12, LLinc, K 13
K
K 13, RLinc, K14, LLinc, K 13
K
K 13, RLinc, K16, LLinc, K 13
K
K 13, RLinc, K18, LLinc, K 13
K
K 13, RLinc, K20, LLinc, K 13
K
K15, move 18 st to holder (we will later turn these into the thumb), CO 4 st via the cable CO method, K15
Divide your stitches in half, with 17 on each needle, with half for the top part of the mitten and half on the palm side.
On 17 st only, work seed st for 22 rows.
Now we decrease to finish off the tip.
SSK, work seed st until 2 st remain, K2tog
Seed st
Repeat the last two rows until 7 st remain. BO.
Alright, you’ve now completed one half of the mitten top. Repeat the exact same procedure on the other 17 st you left waiting.
Thumb:
K2tog, P2tog, work seed st around.
You should have 16 st on your needles.
Work seed st for 8 more rnds.
To create the slit for the thumb, BO 8 st, continue in seed st for 8 st.
CO 8 st using the cable CO method.
Seed st for 4 rnds.
(K2tog, P2tog) around.
Seed st
K2tog, P2tog
Draw the yarn through the loops and cinch tightly.
Now try on your mitten to see how it fits and then sew up the halves of the mitten top, using any method you like ( I used basic whip stitch), leaving a gap that your pointer finger can easily slide out of.
Weave in your ends, being sure to sew up the hole left between the thumb and hand.
I hope you enjoy!
I was in a wee bit of a rush to get this pattern up (since I’ve been dyeing yarn like a mad woman) so if you find any errors, let me know. Have fun!
~Chandi




Hi Chandi!!
I just got my order of your delightful yarn and I am so excited to create with them. Question: I want to make the Converti-mitts; will I have enough yarn to make a pair using your worsted weight yarn?
Thanks and keep on creating!!!
Leslie-Karen
Thanks, Leslie! Glad you love the yarn!
1 skein of the worsted will not be enough… You’ll need about 260 yards, so it would take 2 skeins. But you could perhaps stripe two different colors? Or whatever you prefer!
do you still have “Dover’ in worsted weight?
I do have 1 skein of Dover Castle in worsted wt. I sent you an email with info!
Thank you!
Chandi
I am making the crimson converti mitts and need help!
I don’t understand how you sew these together once you finish the top and the palm. This is my first pair of flip top mittens.
Thanks for your help.
Jenny
Sure, I’m happy to help.
You sew the mittens so there is just a slit left running along the side of your pointer finger. So if your palm was face down, start sewing at the outer (pinky side) knuckle, up and over all the fingers, and then stop. You’ll have a slit remaining from the top of your pointer finger, down to the knuckle of your pointer finger. You can then slide your hand out of this when you want to slip the top diagonally and over to the side of your hand. I hope this helps!
Chandi
I just wanted to know what type of kneedles you use while making this. Do you you straight or round?
Thanks
I almost always use 1 long circular needle and the magic loop method when making items in the round.
Chandi
You are so awesome and my wimpy hands thank you. I have coldest hands in PA.
Chandi, you are wonderful. You have sparked my creative gene with your colours. I dreamt of wolves evolving out of black storm clouds using your pearlescent black. I am so in love with your visions. Thank you. Please keep sharing with us.
Chandi, do you have flip top mitts patterns for crochet? I cant seem to get my hands to work two needles at the same time, but I reaallly want to make flippies for this winter.
No, bu t I am planning on doing some!
Chandi, I don’t know magic loop but am about to start on my first dpn project. Can you do this with dpns and if so how many needles would I use?
Do you have a video on how to make these mittens?
Not yet. We might be making a video on how to create these mittens soon. Stay tuned!
I’m new here, so first let me say you’re adorable! I love your writing and patterns. Question: you tell and show how to wrap a “skein” of yarn into a ball. I’ve been knitting for about 60 years, and have always known this circle of yarn as a hank. Isn’t a skein the stuff we buy some yarns in in stores? I’ve known of hanks, skeins and balls. I’ve just recently been successful at finding the inside end of the flat balls of yarn, making it so much easier to use. Never too old to learn!
Yep! You are absolutely right. It is called a hank of yarn not a skein. I use those terms interchangeably through habit. Hope that helps clear up some confusion. <3
These look csy, can’t wait to try the pattern