A finished object! I wasn’t sure as I awoke early yesterday morning if my knitted Mulberry Hat would be finished. I had worked several hours on it the day before, applying a triple crochet under-brim (more details on that soon), crocheting a flower for it, searching for buttons and attempting to sew on black trim. The black trim was unsuccessful in that, apparently, there is no dark thread in this entire house.
So. As much as I wished to finish it, I reluctantly laid it aside and went to sleep. And was unable to sleep, due to having consumed a large cup of coffee too late in the evening. (5 pm is apparently too late for me to be drinking coffee).
I eventually drifted off and then awoke at 3 in the morning, again unable to sleep. So tumbled off of my new bunk bed (which I happily purchased at a yard sale the previous week to make more space in my tiny bedroom and which I am delightledly sitting under at this moment, as I type on my laptop, on my used-store desk), and proceeded with my day.
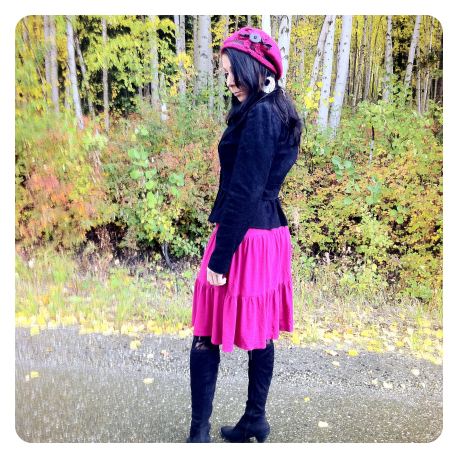
So without further ado, I present to you:
My Fix For the Curling Brim on my Knitted Mulberry Hat and Other Modifications Of Note Completed on Prior Day:
1. I crocheted one triple crochet into each stitch around the brim of the hat.
2. I then folded this triple crochet “flap” up under the brim (to the inside) and whip-stitched it to the inside of the hat, thus preventing the brim from curling. Quick? Yes. Easy? You bet. Recommended? Highly.

3. Ta Da! Non-curling brim fixed in just a few minutes.
4. Then. While sitting at the gym, waiting for my darling to finish working out, I whipped out this little crochet flower. Instructions are simple and as follows:

Curly Petals Crochet Flower Pattern:
-Chain 5. Join with a slip stitch to beginning chain to form a ring.
-Chain 2 (this counts as your first double crochet). Double crochet 23 times into the ring. Join with a slip stitch to second chain from the beginning of the round.
-*Chain 12. Slip stitch into the second chain from hook. Single crochet into next chain. Half-double crochet into next chain. Double crochet into next chain. Triple crochet into next 7 stitches. Petal created!
-Attach this petal to the original ring of double crochets by skipping 3 double crochets and slip stitching into the 4th double crochet. **
-Create 5 more petals in the same fashion. (In other words, work * to ** 5 more times)
And done. You have just created a crochet flower.
5. I then attached said crochet flower to my knitted Mulberry Hat, using a large yarn needle, by whip-stitching around the edge of the flower, allowing the petal tips to curl over, for added interest.
6. As my local yarn store was closing, I had no time to properly search for a button. So Necessity seized me and I created one out of shrink plastic. Amazing stuff, that! I cut a circle approximately 3″ in diameter and cut two slits for holes. Then colored in with a permanent Sharpie marker and placed into a 300 degree F oven for about 1-2 minutes. You must keep a constant eye on this, as it curls up quickly. (Tip: Place your shrinky dink on a paper towel on a cookie sheet). I removed it from the oven, squashed it flat with a fork and allowed to dry. BOOM. Insta-Button. And I loved it. It was perfect. I was thrilled.
7. I attached the beautiful button with thread. And was contentedly happy.
8. I then began a several hour search for dark thread to attach some black ribbon around the brim. I found none. Clear thread showed pretty obviously. I then attempted to use the ribbon AS thread and stitch it in and out in various patterns (using my large yarn needle) around the brim. Didn’t work. I kept reminding myself it would take all of 10 (maybe 15) minutes to drive to the store, purchase thread and return home to quickly complete my hat.
9. I didn’t listen to this voice in my head, but went to bed, with an unfinished hat.
Great News!
I made it to the nearest craft store early yesterday morning, purchased needed dark thread and sewed trim to hat and poked the remaining trim through the button holes, tied knots on each side of the button and dove-tailed the edges. I loved it. I wore it:

I felt darn cute.
I was pleased.
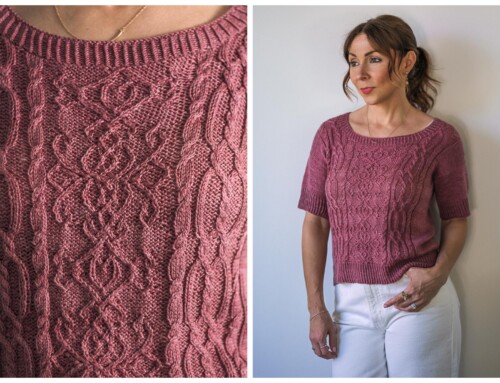
Pattern: Mulberry Hat – Easy to follow and very quick. The only question I had was when it says to place markers for the decreases. It mentions repeating placing your marker 5 times. I repeated it 7 times, so as to have the proper number of decreases in the coming rounds (8 decreases per round). Maybe I misunderstood something?
Yarn: Therapi by SWTC – The yarn was and is a gorgeous color. It was super soft. It was pleasant to work with.
Color: Unknown, but fabulous.
My Hat On Ravelry


Lesson Learned:
If you’re going to knit a hat, understand that sometimes finishing said hat takes as long or longer than the initial knitting. And I’m okay with that. 🙂
P.S. Lesson #2. Sometimes attempting to get proper photos using nothing but an iPhone on a really dark, cloudy day can be…time-consuming. I do love how a few of the photos turned out vintage-looking, though.
Here’s to happy knitting!
♥♥♥
Gorgeous!
Oh, thank you so much!
Your Mulberry Hat is so beautiful – I love the color! I am sorry to bother you but want to know how you kept your markers from falling off the double pointed needles? Or did you use Magic Loop which I’m not skilled at. Thank you!!
Hi, Jeanie!
It’s been a while since I made the hat, but I probably used the magic loop method. I almost never use dpn’s unless I have to. 🙂 Thank you for the nice compliment! I appreciate it. ~Chandi
Hi Chandi, thank you for your blog. You have solved the problem of the “curling brim”. I knitted this hat but struggled with the brim. I logged onto my Ravelry and found your blog after searching for anything on the Mulberry Hat. I will have another go at the brim now that I have seen your notes and your lovely pics of your hat! I also agree with your notes about the decreases – I did the maths when I came to this instruction and found that 7 times (not 5 times) worked correctly. Thank You.