Well, HELLO!!
I hope this post finds you well today! I wanted to tell you about my new sweatah!
I have to say… I’ve made a few sweaters before (knitted not crocheted) and haven’t worn them (much). I loved making them (for the most part), really liked the final results… attempted to wear them…. and ended up not. (Well, maybe once or twice… okay okay). 🙂
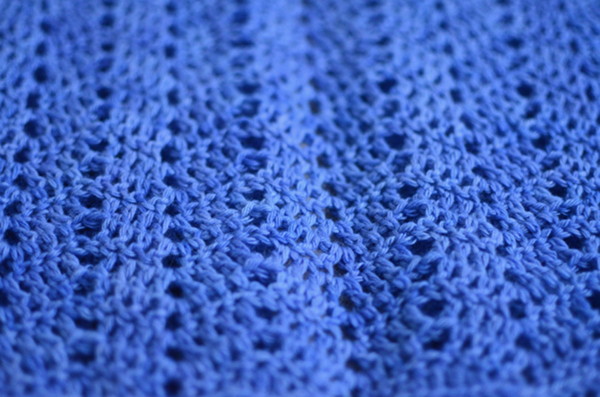
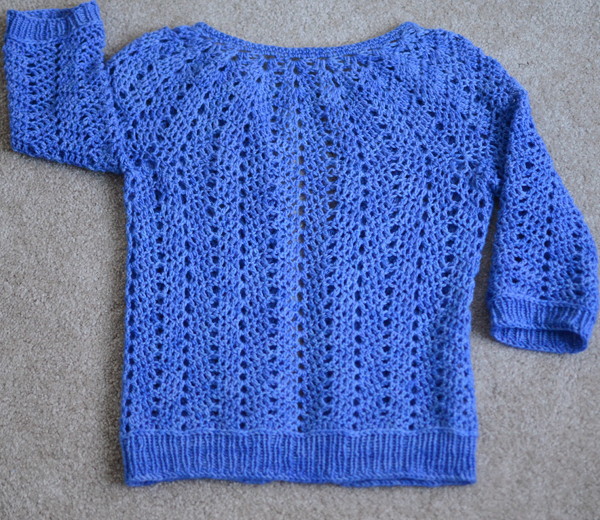
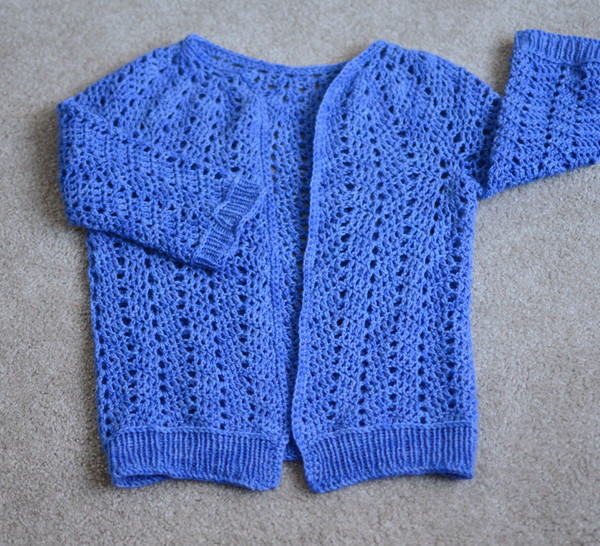
But I just finished up this gorgeous Chevron Lace Cardigan (which is a free pattern on Ravelry) and have already worn it and have gotten tons of compliments! I AM IN LOVE!
Okay, first of all, if you know how to knit AND crochet, definitely try crocheting a sweater.
So.
Much.
Faster.
I know crafting isn’t all about the speed, but hey… sometimes it is! The faster we are, the more we can create! And I am addicted to productivity and accomplishment.
I whipped this sweater out in a week. Boom. DONE!
![]()
Don’t let the thought of a sweater intimidate you… just start! If you get stuck on the pattern, there are LOADS of projects on Ravelry and you can browse through there and see what others have done. And look at the pictures.
I found this pattern super easy to understand. And I made some mods! So here’s what I did along with tips for what you should do if making it:
- Start with a REEALLLY loose starting chain. The starting chain creates the neck and I did mine too tightly. I should know better after all these years of crocheting, but alas. I felt like I wouldn’t have gotten those puckers around the neckline if my starting chain had been a bit looser. More loose. Loosier goosier.
- I started with the recommended J hook, but when I got down to the waist (you work your way down from top to bottom), I switched to an H hook. I wanted an I but couldn’t find mine. This helped to prevent any weird flare out or stretching at the bottom. TOTALLY happy with this decision! It really helped to bring in the waist area!
- I also used the H hook on the sleeves. They fit just fine but are ALMOST too tight. Wish I had used the J hook so they’d be just a smidge looser.
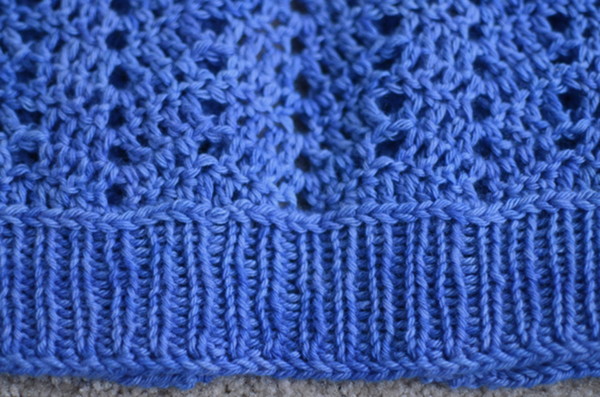
- I knitted (Gasp! Combining knitting and crocheting into one piece? Yep) the bottom of the sweater and the bottom of the sleeves. I did a basic 1×1 rib stitch, for a nice, smooth, professional finish. How do you do this? Well…—>
- Before starting the ribbing, I attempted to even out the bottom first. It was wavy because this is a chevron pattern. I didn’t want my knitted rib to be puckery, so I did a quick crochet row around (and I did the same thing on the sleeves too) to even out the bottom and make it more smooth/straight. Basically where the pattern dipped, I did double crochets. Where it peaked, I did single crochets. So I worked 6 single crochets over the peaks, did a half double crochet, 2 double crochets, a half double crochet, and then started over with the 6 single crochets… around and around. This created a nice smooth edge.
- Then I picked up one loop in each stitch around with my knitting needle and just proceeded to knit. Quite easy really!
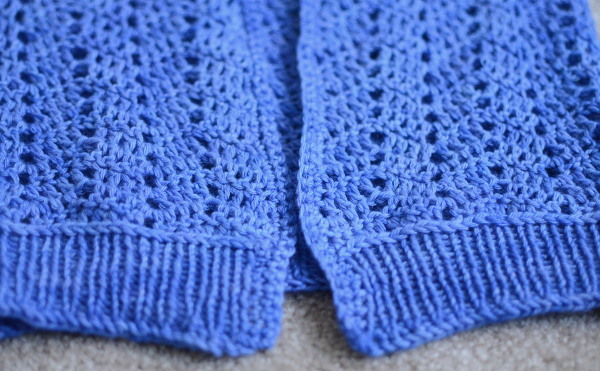
- I opted for 3/4 length sleeves as it’s still chilly here in Alaska and plus I thought it was a good length to draw attention to my waist, which is a feature I try to highlight. Show off the good stuff, hide the less than good stuff!
OTHER INFO:
YARN: I used just over 3 skeins of my DK weight 100% Pure Cashmere. It. Is. Heaven. Soft. Soft. Soft. But holds its shape well and should last for years to come! Colors change all the time in my shop, but this is my Blue Periwinkle. If I had made the sleeves just a row or two shorter, 3 skeins would have been enough. (I made the smallest size.)
STYLING OPTIONS: With this blue, I opted to wear it over a cream dress with neutral/brown and gold jewelry. Worked out well! I actually chose the color and length of the sweater to go with jeans. So I’ll try it soon like that and see how that works!
HOOKS: I used the J like the pattern called for, and switched to an H when I got to the waist. I also used an H for the arms, but wish I had used the J.
NEEDLES: For the knitting needles, I used US size 7.
TIME: It took me 1 week to make this and I didn’t even have to “push” myself. It was enjoyable the whole way! After a week, I start to lose interest. After 2 weeks, I’m usually bored to tears and forcing myself to finish something. 3 weeks or more… forget it. It just becomes torturously boring. So I now only choose projects I can finish quickly. A 1-week sweater is AWESOMMMMEEE!
BUTTONS? I did actually make a wee button hole while crocheting around the front and neckline (by doing a chain 3 and skipping 3 stitches), but decided on not using it. I don’t think I’ll ever button it, but will just let it hang. And I thought just 1 button would look strange anyways.
So there you have it! I hope this inspires you to give sweater crocheting a try! It’s so rewarding and ultra-quick.
I’ve already started on my next pattern which I’ll tell you about soon!
Enjoy your day… I’m headed out for some chia pudding and a steamer at our local coffee shop. Spring is here in Alaska and everything is sunny and drippy and meltingggg! Oh! The gloriousness of coming out of a long, dark winter into the first hints of spring! Love. IT!
Find some time today to be good to yourself and do some crafting. It’s good for the soul. And my motto is, the happier you are, the happier others around you will be!
Over and out!
XOXOXO
Chandi
![]()
P.S. Please comment below and let me know what you think about the sweater! Have you ever made one and if not, what’s holding you back?
looooooove it. Of course, you can throw on a paper bag and look lovely, but it is stunning on you. I am making one now (I am bigger than you are – thus taking more time) and am doing it in cotton yarn for summer. I like your modifications – made a few of my own – and next time, I agree about making the starting chain looser. I will go up a few hook sizes for the starting chain and then dial it down from there. And…I might have to indulge in some of your incredible yarn for my next cardi. Totally faster than knitting a sweater, and no fussing with knitting two sides at the same time, etc.
Great job!!!
Loooove the way this turned out!! I have the pattern in my faves on Ravelry and I think I will incorporate some of your ideas when I make it. I love the look of the knitted ribbing!
I have been waiting for your feedback on this cardi so I can start mine! I’ve had this pattern pinned for awhile. Now I am DEFINITELY making it! I am a crochet loving lady (19yrs), and too love to add knit into my crochet. After you added the ribbing to this sweater it pretty much sealed the deal for me! I will post pics when I finish mine.
Thank you for sharing, and inspiring!
I absolutely love your sweater!! I’ve eyed up this pattern for a long time and I really, really want to make it now with your knit mods.
It turned out gorgeous! Love the mods you made with the ribbing and the shaping for the waist. I’m working on making my own vest pattern, and was going to try to add sleeves to it from there once I worked out all the kinks. I guess it’s intimidating to start trying to make clothing because I’m afraid I’ll love it until I try it on at the end, lol! I made myself a cute green and white bikini top in cotton for last summer, but I can’t swim in it because it got so heavy, so it’ll have to do as just a cutesy top when the weather’s hot. 🙂
Thanks for posting, and for the endless inspiration you give all of us!!
Gorgeous!!!!
I am working the courage to embark on a sweater making when I do I will send you a pic.
Wow! Looks amazing! Love the pattern, the color and the styling!
You sweater is gorgeous! That yarn looks yummy, too! I’ll have to buy some:)
Hi Chandi! Love the sweater and the color you chose. It looks stunning on you!!! I’ve never made myself a sweater but this inspires to make one for myself. Going to print the pattern and get right on it. I love reading your blogs for encouragement!!:))) Have a great day!!!
The sweater looks so cute on you! Great job!
Beautiful! 🙂 You have a wonderful sense of style. I’m quite jealous!
I’ve never crocheted a sweater because I don’t feel I’m up to the challenge just yet. Besides, if I want to crochet something for myself to wear, I will most likely have to adjust the sizing up quite a bit. :-p That’s definitely a challenge I’m not up to yet! lol But I am learning new stuff here and there, and someday I *will* attempt clothing!
What a beautiful sweater! Hmmm, I may have to learn to crochet afterall! Lovely color!!
Love it! And I love Blue. I Crocheted back In the ’70! Then last year I made 5 Afgans for American Girl Dolls, then about 2 dozens of those Frully Crochet scarves that were very popular last yr. I had some cabinets built and was filling them when I ran across some silk yarn & thought I would try knitting again. Well, that didn’t work, so I started looking at patterns & seeing that better yarn is being used for crocheting…. Now I’m hooked. That knitted scarf is almost a crochet scarf, my April Mystery yarn is done – wore it today & got a lot of compliments… Learning Tunisian Crochet also. And tomorrow I start on a cowl.
Thanks for your inspirations, you have made this learning process FUN!
Turned out just beautiful! Definitely starting mine today 🙂
I love this so much. You do awesome work and you are beautiful, so that means you could wear a gunny sack and make it look great!
I love this blue sweater looks wonderful on you. I would like to find this pattern and do it in red? Maybe a little longer? I like the fact that the finish is knit but most of the sweater is crochet!
Maxene
Love it – trying to decide on color!
Great blog here! Also your website loads
up very fast! What host are you using? Can I get your
affiliate link to your host? I wish my web site loaded up as quickly as yours lol
Oh, yours turned out wonderfully! This pattern is #3 in my queue and I have some beautiful purple-y pink alpaca yarn that I got at a fiber show in May. I’ve never made a sweater before and the pattern was a little daunting, but I think I’m going to use some of your tips when I finally start mine.
Thanks for the inspiration.
I just started my own blog (in Danish), and since I got so much help from your blog while crocheting the Chevron Lace Cardigan, I made a link for others to get inspiration here too. I hope that’s alright. 🙂
http://moensterbryder.wordpress.com/
Love the color and what a great idea, using crochet and knitting. Your yarn and your colors are always amazing!
Gorgeous color!
Just started one. Thanks for the suggestions!
For those who have made this sweater can you give me some idea how far you went before you split it for the sleeves? Thanks
Hi Chandi, I stumbled upon your blog when looking for instructions for this cardigan. I absolutely adore your version and have incorporated some of your changes into the one I’m currently making. All worked out fine, until I’ve now come to the part with the knitted borders. I simply cannot figure out how to pick up the loops from the crochet. I’ve tried a few different ways, but I don’t seem to get the result that you have. I’m aiming to get the same horizontal braided line as a divide between crocheting and knitting that your picture shows. I suppose it’s the top crochet row as seen from the front. My problem: Either my knitting starts way too loose (too much distance to that line) or the knitted ribs start off twisted. Can you advise which loops to pick up and in which direction to pick them up with the knitting needle?
I’ve tried to find tutorials, but it seems to be an unusual combination, adding knitting to crochet and not vice versa.
Thanks very much in advance and kind regards from Germany
Chris
Chris, I would dearly love to help out, but it’s been so long. I don’t remember! Feel free to ask on our Ravelry forum here, though: http://www.ravelry.com/groups/expression-fiber-arts