Here’s a quick and easy way I came up with to make a cute and very functional pin cushion, if you’re a yarn-lover like moi.
I do occasionally sew and also use pins when blocking my hand-knit and crocheted items, and thus, found myself needing a pin cushion. I thought, why not make one out of one of these 5,000 balls of yarn I have laying around? (Slight exaggeration.. maybe) 😉
But of course, you can’t have your yarn ball rolling around like a tumbleweed, so I came up with this method to give it a sturdy, functional base while providing a handy, cute, customizable pin cushion.
Without further ado, here is the tutorial:
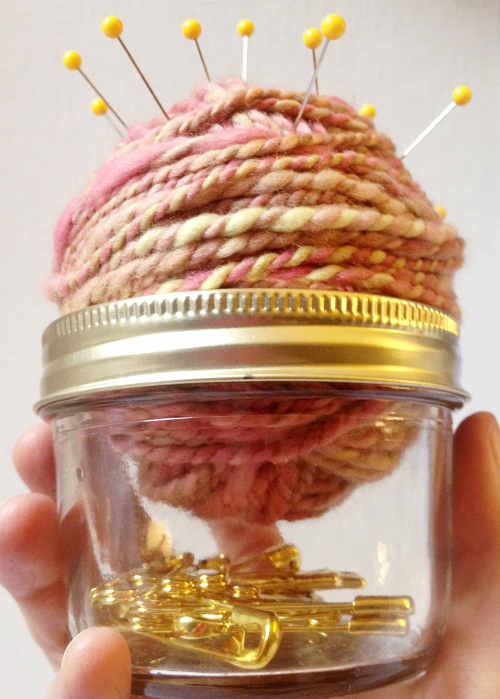
Step 1: Obtain a mason jar and remove the inner metal part from the lid. I am using an 8 oz jar with a wide mouth. Paint the jar lid if you like. I left mine gold.

Step 2: Find a lonely ball of yarn that matches your pins and/or decor or just makes you happy. 🙂 Adjust the size of the ball of yarn by unwrapping or adding on more yarn from another ball (like I did) until you get the proper size to fit into your jar lid. Here, I am using the second ball of yarn I ever spun (from several years ago when I began spinning). I thought it matched the pins pretty well, and the gold rim of the jar.

Step 3: Once your ball is the right size, plop it down into your lid rim. Note: You want the ball to fit about 1/3 of the way down in. This prevents the wider, middle part of the ball from pushing through into the jar and also prevents valuable jar space from being taken up. I adjusted mine so that the horizontal yarn wrapping sort of “sat” on top of the rim.

Step 4: Admire your work and feel very proud of yourself. I debated on glueing the yarn ball in, but that would ruin the yarn. I’ve found it doesn’t push through at all, and remains very snuggly in the rim. So make sure it feels snug, but if you ever tire of this color, you can easily remove the ball and use a different one! Hurray!

Step 5: Insert pins lovingly, as you apologize to the yarn for hurting it

Step 6: You can put whatever you like into the jar, as it’s really easy to open and close, without disturbing your new yarn ball pin cushion top. Some gold safety pins, perhaps, to match the theme?

And done! You may now pick up your new pin cushion, created in under 5 minutes, and feel very smart indeed. 😉
The portion of the yarn ball inside is not really visible unless you pick it up and look up into the jar. But if it bothers you, you can glue some ribbon onto the top part of the jar, just under the rim, to hide the yarn inside. But I left mine as-is.
I’m really happy with my new pin cushion, it didn’t require any sewing (ironically, this makes me happy, as I’m going to use the pins…for sewing?) and was super fast to make.
You could make several in matching colors, in slightly different jar sizes and include matching doodads inside… That would look awesome indeed! Very handy for storing all your crafty supplies!
Well, I hope you enjoyed this quick and easy yarn ball pin cushion tutorial!
I’m headed off to my nephew’s bon fire birthday party, and then it’s another week of dyeing yarn for you. The deal of the week is listed here on facebook, if you’re interested! It’s a 25% off coupon on a certain category of yarn… Oh, it’s very exciting!
Much love from me…I appreciate each and everyone of you and hope your week is amazing!
~Chandi
P.S. Thank you all for the honest, heart-warming comments you left on my last blog post. You made me cry with empathy and joy! That post was so scary for me to write as it revealed a part of me I usually keep hidden and protected. But by opening up, I see we are all very similar and you are all so supportive and giving. I couldn’t be happier to have connected with you. XOXOXO


GREAT idea! Have lots of Mason jars and balls of yarn. Going off in search of the perfect combination now. Thanks so much for the inspiration 🙂
Great idea. I’m going to do it!
I love this idea. I used all my jars to make jam, but as soon as I have one cleaned.. I am sooo going to do this!!!
Have a GREAT week, Chandi!
Brilliant idea as usual. Will definitely make soon.
I shall use a larger jar & use it for needlefelting bits & pieces.